Image Scaling with GDI+ Part 1: Introducing the Reference Resizer
In future posts, as I discuss the relative merits of MagicScaler, I’ll be doing a lot of comparison to System.Drawing (or GDI+, the underlying API). As far as image processing in ASP.NET goes, it’s been pretty much the only game in town, despite the ubiquitous warnings that it shouldn’t be used in that way. My goal was to make MagicScaler an attractive replacement for image scaling in GDI+, so that’s been my benchmark. The problem is, there’s so much variety across GDI+ resizing implementations that it isn’t necessarily clear what it means when I say that MagicScaler is faster than GDI+ or that its output quality is better.
This series of posts will discuss some of the internals of DrawImage() -- the core of GDI+ image scaling -- and how various resizing implementations can be so different while all using the same method call to do their work. I’ll also discuss the implementation of my reference GDI+ resizer, which is basically a stripped-down version of the resizing component I used for my clients’ websites before I wrote MagicScaler. Given the number of flawed resizer implementations in the wild, the dearth of accurate documentation on the subject, and volume of misinformation out there, I thought it was worth taking some time to document what I’ve learned in my years of working with System.Drawing/GDI+, even as try to convince you to leave it behind. I hope this will serve as a good reference for anyone who may wish to (or need to) stick with a GDI+ implementation of their own.
Where practical, I attempted to make my reference GDI+ resizer feature-compatible with regard to MagicScaler so they can be compared directly in as many scenarios as possible. I also attempted, within reason, to maximize both the performance and image quality of my reference resizer within the limitations of GDI+. I’ll be writing quite a bit about the ways I do that, starting in the next post. And hopefully in the future, as I present all the reasons you should use MagicScaler instead, you’ll be confident that I’m showing GDI+ in the best possible light for my comparisons. My goal was to benchmark MagicScaler against the best GDI+ could do both quality and performance-wise, not an artificially handicapped implementation.

In order to give you a better idea of the implementation differences to which I’m referring, in this post I’ll be comparing my reference resizer to the most popular System.Drawing-based image resizer on nuget: ImageResizer. It actually does do as well as you can do quality-wise with GDI+, but it falls victim to some of the pitfalls I’ll be pointing out in this series and, as a result, has less-than-stellar performance.
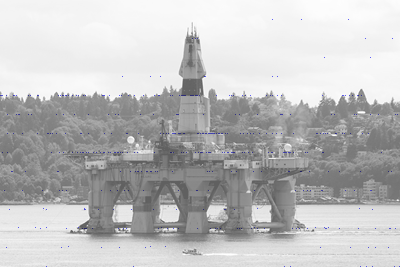
Take, if you will, this quite ordinary 1MP JPEG test image. I resized it with both components to test the relative performance.
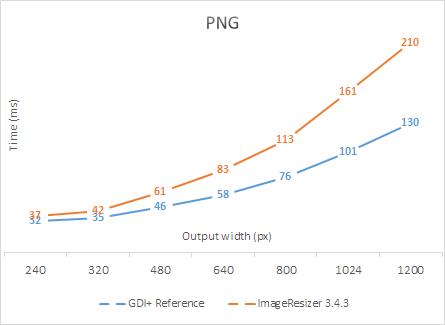
This graph shows the speed difference between the two resizers at a variety of common output sizes. The tests were performed using the default (highest quality) settings for both components. I changed only the output format, which I set to PNG for more accurate visual comparison. Speed comparisons are worthless if we’re not producing the same output quality, so I checked the outputs of each test using Beyond Compare to make sure they matched. Each test consisted of a warmup and then 10 runs, with the processing times averaged. At 240px output width, ImageResizer is 16% slower. As the output size increases, so does the difference in performance. It clocks in at 62% slower for the largest output image I tested.
And just so we have something other than graphs to look at, here’s a side-by-side visual comparison of the test output at 400px.
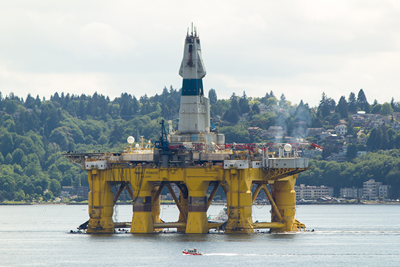
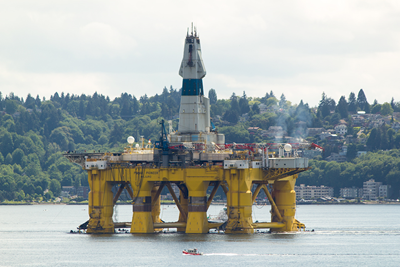
The image on the left was created with ImageResizer 3.4.3 and the one on the right was created with my reference GDI+ resizer. They’re visually indistinguishable, but the one on the left took 27% longer (52ms vs 41ms) to produce. It also weighs in 10% larger (225KB vs 204KB) because it was unnecessarily saved as PNG32 instead of PNG24.
Notice I said the images are ‘visually indistinguishable’ and not ‘identical’. Below is the Beyond Compare diff view to illustrate what I mean. I set the tool’s threshold at 1, so identical pixels are shown in greyscale, pixels that differ by 1 (out of 256) are blue, and anything off by more than 1 would be red (there aren’t any).
This goes to show you can’t really trust your eyes when it comes to comparing images. Especially when viewing images side-by-side, we may trick ourselves into thinking we see differences that don’t exist. Or we may miss small differences that do exist. This kind of comparison can also give clues as to how implementations differ.
When two images are this similar but not identical, it’s usually the result of floating point rounding differences somewhere in the processing. It’s clear that ImageResizer is doing some extra processing on the image (that’s why it’s slower), but that processing didn’t make any visual difference in the output. It actually wouldn’t be unfair to say, then, that where there is a difference, the output from the reference resizer is more ‘correct’ since it does the minimal processing necessary to get the desired result. But again, these are differences of 1 in the RGB values, so they’re not visible at all, and I would call the images absolutely equal in quality. Had I encoded to JPEG, these differences could be either amplified or cancelled out by the quantization, which is why I tested with PNG initially.
Some of you might be wondering at this point if the difference in encoder pixel formats between the two test outputs is the main reason for their difference in speed. Actually, it does make a small difference, but it’s only one of several areas of inefficiency. If fact, the two resizers are even further apart performance-wise with JPEG output, where the work done by the encoder is equal. Here I ran the tests again with the default settings except for JPEG quality. Normally, my reference resizer dynamically adjusts the quality setting depending on output resolution, but for this test I manually set it to 90 to match the ImageResizer default.
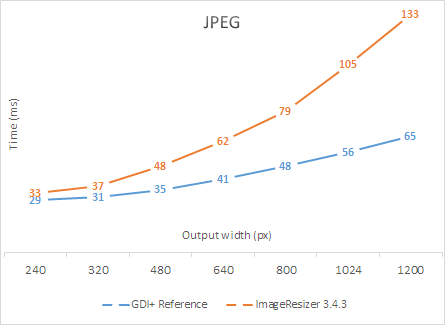
Because the JPEG encoder is much faster than the PNG encoder, the effect of suboptimal GDI+ settings is even more pronounced here. ImageResizer is 105% slower at the max size I tested. Ouch.
Mind you, ImageResizer isn’t always this much slower compared to a more optimized implementation. But this test was representative of some of the most typical web image resizing scenarios, so it’s really worth the extremely small amount of effort it takes to get it right.
And I guess while I’m picking on ImageResizer, I’ll go ahead and point out another common architectural problem it has that isn’t clear from the tests above. It uses a ‘push’ model rather than the GDI+ default ‘pull’ model for its processing pipeline. Essentially, that means it decodes the entire source image into memory and pushes it through to the next step, whereas my reference resizer pulls only the pixels it actually needs through the decoder. I’ll be documenting that much more fully in another post in this series, but for now, to demonstrate the difference in performance between the two, I’ll crop and scale a section out of the the original 18MP version of the same test image I used above.


This time, the two resizers created visually identical images (no off-by-1 pixels), but ImageResizer took 4.7x as long (448ms vs 96ms) to do the same job. It also used a lot more memory during that time. I’ll have more on that later as well.
With those kinds of inefficiencies, it would be easy to make MagicScaler look good by comparison, but that wouldn’t be very sporting, would it? That’s why I’ll be comparing to my reference GDI+ resizer from now on. And since the types of mistakes that make ImageResizer slow are quite common in GDI+ resizing implementations, hopefully the information in this series can help others avoid them in the future.
If you want to check out its not-so-secret sauce, the code for my reference resizer is available in this gist. If you’re familiar with the ins and outs of GDI+, it should be pretty self-explanatory. If you’re not, I’ll be calling out the high points and explaining them starting in the next post. I’ll also be doing some follow-up posts on some of the more gory details of how GDI+ works. You may find some interesting things in those even if you’re already a System.Drawing/GDI+ expert.
Oh, and one last thing… I really meant my GDI+ resizer to be thrown away once I finished my comparisons with MagicScaler, so I’m just sharing its code as a sample, not as a ready-made component. It’s designed to use one of the shared components (ProcessImageSettings) from MagicScaler so that the two can be used interchangeably in my test/benchmark harness. That settings component handles the math for the dimensions, crop, and JPEG quality, and the resizer is incomplete without it. It doesn’t take much work to replace the missing pieces if you’re so inclined. But by the same token, there’s not much to the resizer itself, so feel free to take any code from it that might be useful, and integrate it into your own projects. Or better yet, use MagicScaler ;)
Next up, a review of some of the features and code details from my GDI+ resizer…
