Examining IWICBitmapScaler and the WICBitmapInterpolationMode Values
As I mentioned in my first post introducing MagicScaler, it was inspired by Bertrand Le Roy’s blog post detailing an ASP.NET image resizer using WIC. His sample images looked decent, and the speed upgrade over System.Drawing/GDI+ was tantalizing. But when I grabbed the sample code and compared the image quality to GDI+… well… there was no comparison. It appeared WIC’s scaler was just no good quality-wise. In this post, I’ll be trying to answer the question of why that is.
Turns out it’s not that simple, actually. You see, WIC has a bit of magic of its own under the hood, and that makes evaluating its scaler a little bit more tricky than you might expect. The same goes for WPF, as it’s using the WIC primitives. I don’t think I’ll bother breaking down the performance/quality of WPF separately because its non-deterministic cleanup makes it a poor choice for server-side image resizing, but most of what I’ll say about WIC also applies to WPF.
The problem most people will have when evaluating WIC’s scaler is that they’ll start with JPEG source images, and WIC has some performance optimizations that kick in for JPEG sources. Both the speed and quality shown in the post I linked above were influenced by this. WIC has the ability, through the IWICBitmapSourceTransform interface, to use the image decoder’s native scaling capabilities to augment its own. Both the built-in JPEG and JPEG-XR (aka HD Photo) decoders support native scaling. I haven’t read up enough on JPEG-XR to know how it works, but since it’s a Microsoft-developed standard, you can bet their own decoder is the flagship, and it can apparently do native scaling in either direction in powers of 2. I’m more familiar with JPEG, where decoders can do native downscaling in the DCT domain by simply reinterpreting the encoded 8x8px blocks as a smaller size. That means it’s easy and fast to scale a block to 1/2 (4x4), 1/4 (2x2), or 1/8 (1x1) its size within the decoder, while the data is still DCTs rather than pixels. WIC will do this automatically if your processing chain is compatible, so the results you see from scaling a JPEG are likely a combination of the decoder’s native DCT scaling and the requested WIC interpolator.
That all means WIC can be unbelievably fast at scaling when it’s able to enlist the decoder’s help, but the quality will take a hit. Scaling in the DCT domain involves discarding some of the high-frequency data stored in the source image, so the scaled version will be blurry compared to one that is decoded at full resolution and then shrunk with a high quality scaler. That’s what I was seeing in my initial evaluation.
Those performance optimizations are great if you’re looking for the ultimate in speed and memory efficiency, but it does cloud the issue of exactly how fast the WIC scaler is and what kind of quality it produces. When scaling non-JPEG images or when adding steps (such as a crop) to the processing chain that are incompatible with IWICBitmapSourceTransform, you will generally find the speed will be worse, and the quality will be slightly better.
Ok... with that out of the way, I’ll move on to the titular topic. As in my previous GDI+ analysis, I’ll be using ResampleScope today. ResampleScope works only with PNG images, so we’ll know we’re looking only at the WIC scaler, not a blend with the decoder. I’ll start with the well-known algorithms before moving on the to mysterious ‘Fant’.
WICBitmapInterpolationModeNearestNeighbor
This one is just what you’d expect. Very fast, very bad quality… unless you’re in to the blocky look or are resizing some 8-bit art. It’s worth noting (or not) that while GDI+ and MagicScaler give identical output with their Nearest Neighbor implementations, WIC outputs a completely different set of pixels. Ultimately this comes down to a difference in what the interpolators consider to be the ‘nearest’ pixel, so they don’t have to match exactly to both be ‘correct’. But it’s interesting that they’re different.
WICBitmapInterpolationModeLinear
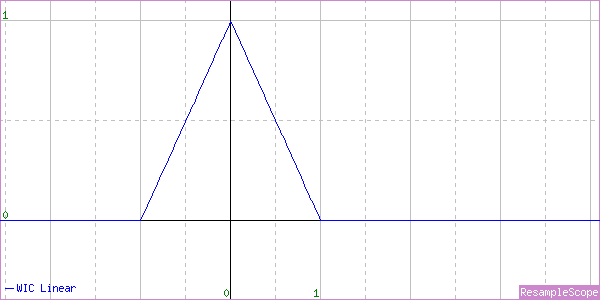
I’ll do the same set of tests I did with my GDI+ examination. First an enlargement, then a shrink to 50% and then 25%.
Oh, and in case you missed the link in the last post, Linear and Bilinear mean the same thing. Like flammable and inflammable.
That looks nice. A perfect Triangle Filter for enlargement.
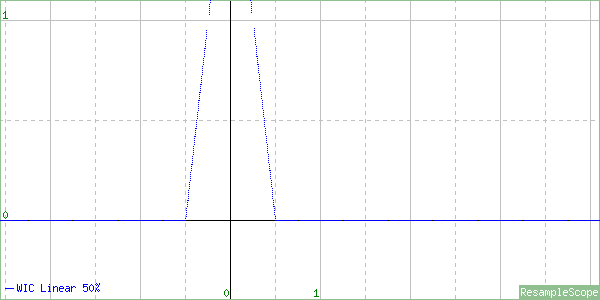
Oops. At 50% of original size, the triangle is just squeezed in. It’s not scaled at all, nor does it adapt toward a Box Filter by clipping the top and changing the slope like the GDI+ one does.
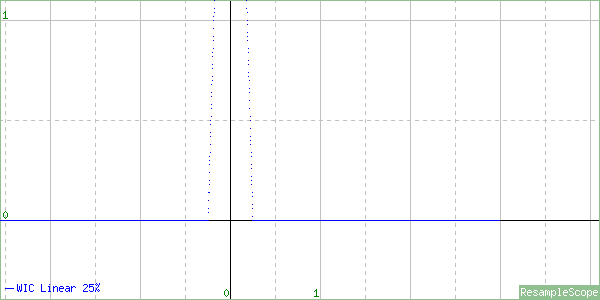
At 25%, it’s just squished even more. If you resize far enough down, this will start to look a lot like a more expensive Point Filter (aka Nearest Neighbor).
To be fair, the WIC docs do describe exactly what we’re seeing here.
“The output pixel values are computed as a weighted average of the nearest four pixels in a 2x2 grid.”
That’s fine for enlargement, but normally an image scaler will scale the sample grid up when scaling an image down. In other words, when shrinking by half, the sample grid would be doubled to 4x4 to make sure all the input pixels were sampled. WIC simply doesn’t do this.
This interpolator is just plain busted for shrinking. Don’t use it.
WICBitmapInterpolationModeCubic
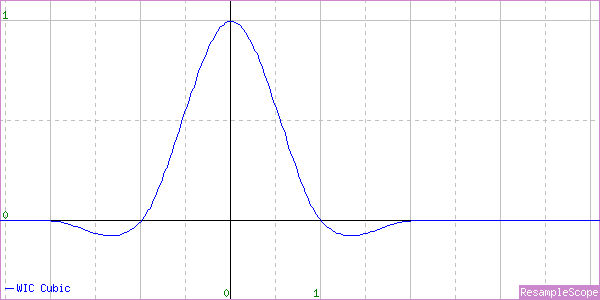
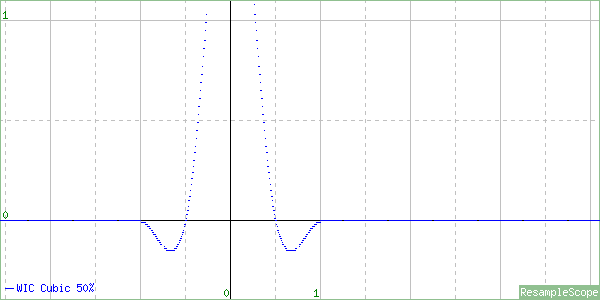
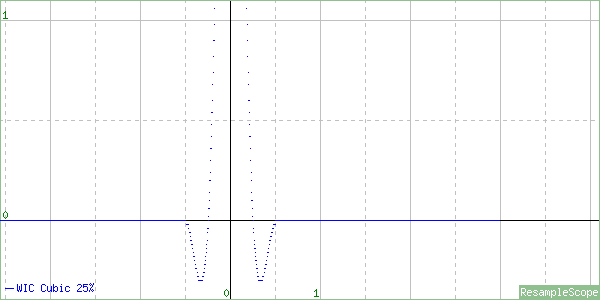
And here’s the Cubic implementation. Any bets on what we’ll see?
A nice looking Catmull-Rom Cubic for enlargement.
A not-so-nice squished Catmull-Rom for the 50% shrink. Unacceptable for use.
Once again, we have an interpolator that is completely unscaled for shrinking. This will also converge toward looking like a Point Filter but slower and possibly with weird artifacts from the negative lobes.
And again, this is exactly what the docs describe if taken literally:
“Destination pixel values are computed as a weighted average of the nearest sixteen pixels in a 4x4 grid.”
WICBitmapInterpolationModeFant
Ah, the mysterious Fant algorithm… It’s difficult to find any good information on this one. The docs simply say this:
“Destination pixel values are computed as a weighted average of the all the pixels that map to the new pixel.”
So that’s a start. At least they’re saying they consider all the pixels, so we have reason to expect this one is properly scaled. But what is the algorithm and why is WIC seemingly the only thing using it?
The algorithm appears to be described in this 1986 paper and this 1988 patent by one Karl M. Fant, and it took all my google-fu to even find those. So it’s old and obscure… but is it any good? Well, the patent is short on math, and I have a feeling the paper isn’t worth the $31 it would cost me to see it, so we’ll just judge it by its output characteristics. Let’s start with an enlargement.
Hmmmm… that’s just a broken Linear interpolator. Note the half-pixel offset to the left (left means up when scaling vertically, so your output image will be shifted up and left). The patent that describes this algorithm is focused on real-time processing and mentions that the final output pixel in either direction may be left partially undefined. The left bias is consistent with those statements in that for real-time processing you’d want to weight the first pixels more heavily in case no more came along. This is particularly true when you consider the vertical direction, where you might not know whether another scanline is coming. It’s a decent strategy for streamed real-time processing but not great for image fidelity.
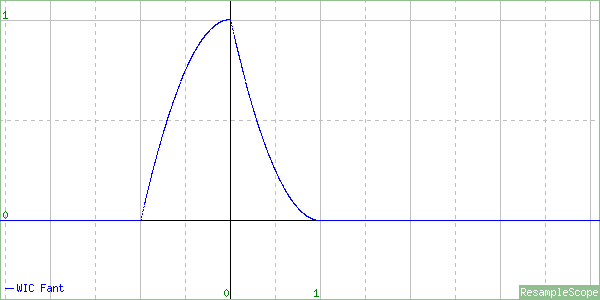
With that, I’ll move on to a minor (<1%) shrink.
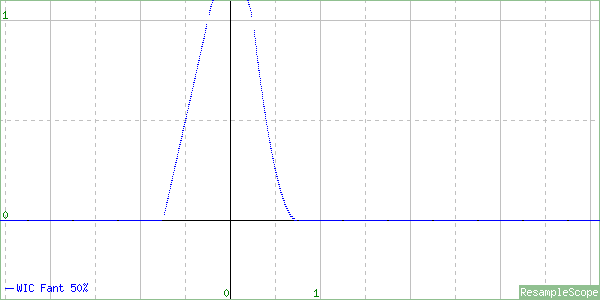
WTFF is that? Looks kind of like a shark fin. This is the first asymmetric interpolator I’ve seen implemented in a commercial product. There’s probably a reason for that. The peak is now centered, but because most of the sample weight falls left of 0, this interpolator will also tend to shift the resulting image up and left. Again, I suppose it’s consistent with the design goals but not the best for quality. How about a 50% shrink ratio?
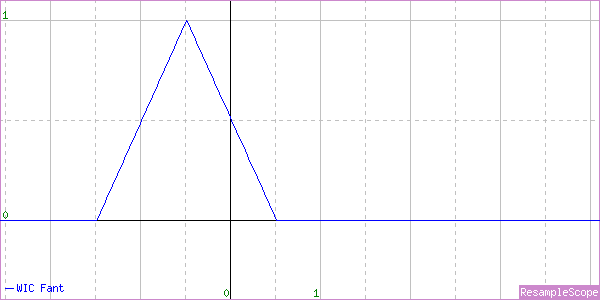
Oh dear… They’ve just squished the shark fin. Sigh… Let’s look at 25%.
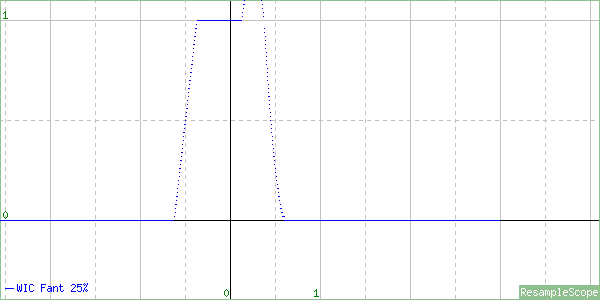
Well, that’s something. It’s starting to look like a bit like a distorted Box Filter, so it is, in fact, sampling all the input pixels. It’s also much closer to being centered, so the up/left shift won’t be as perceptible when you do higher-ratio shrinking.
So there you have it… Fant means ‘broken Linear’ for enlarging, ‘slightly-less-broken Box’ for extreme shrinking, and ‘funky Shark Fin’ in between.
The best you can expect from this interpolator is somewhat blurry, possibly shifted output. At some downscale ratios, particularly around the 50% mark, you can expect even worse aliasing. I wouldn’t use it for enlarging because of the pixel shift and the fact that both the Linear and Cubic interpolators are correctly implemented for upscaling, so they’ll give better results in that (and only that) case.
The really sad thing is that this is the highest quality WIC interpolator available in Windows 8.1/Windows Server 2012 R2 and below. And it’s slightly worse than the low quality Bilinear interpolator in GDI+. That explains much.
WICBitmapInterpolationModeHighQualityCubic
This one just appeared in the SDK refresh for Windows 10, and I haven’t had a chance to check it out yet. I’m looking forward to that. I’ll do an update here when I do, but the description from MSDN sounds promising:
“A high quality bicubic interpolation algorithm. Destination pixel values are computed using a much denser sampling kernel than regular cubic. The kernel is resized in response to the scale factor, making it suitable for downscaling by factors greater than 2.”
So basically, it sounds like it’s a not-broken Cubic interpolator. That will be nice. Unfortunately, unless they release this in a Platform Update pack for down-level Windows versions, it won’t help anyone with ASP.NET resizing for quite a while. MagicScaler to the rescue!
Update 11/23/2015:
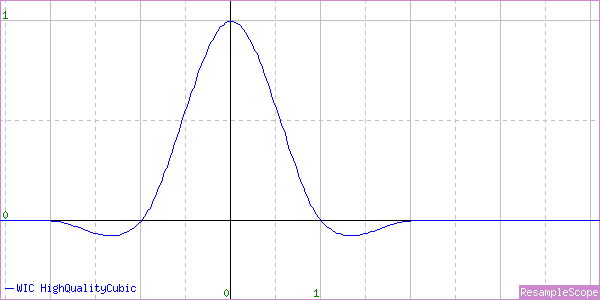
I finally got a copy of Windows 10 installed, so I was able to look at the new HighQualityCubic interpolation mode. I’ll jump straight in to the graphs:
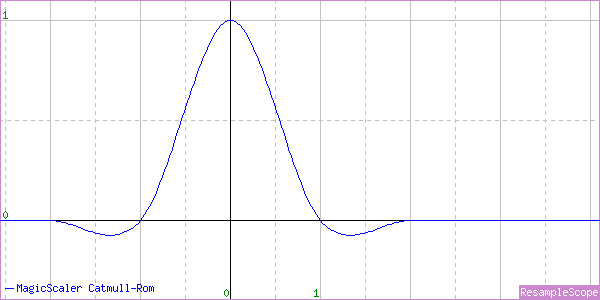
For upscaling, we have a mostly standard Catmull-Rom Cubic. I noticed when looking at this one that the curve isn’t quite perfect. It has a couple of weird bumps on it and is very slightly shifted right. By contrast, the MagicScaler Catmull-Rom shows a perfectly smooth and centered curve.
There shouldn’t really be a perceptible difference in image quality because of that, but I found it interesting. Looking back at the Cubic graph I did last time, it appears to have the same imperfections. Looks like maybe they re-used the code for this one. Let’s check out the downscale.
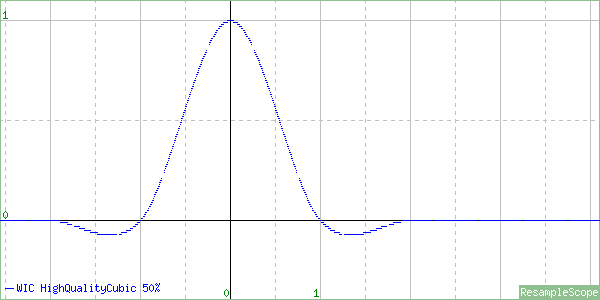
Well, what do you know… it’s a properly scaled Catmull-Rom implementation for the 50% downscale. It also seems to be centered now.
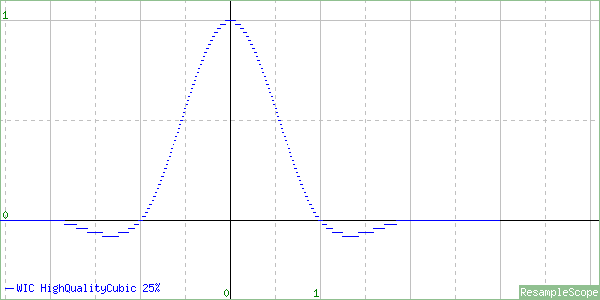
And the same at 25%! Finally a proper built-in scaler in WIC. I’ll do some performance testing later, but this is looking like a great improvement for Windows 10/Windows Server 2016.
