PhotoSauce Blog

0 Comments

As I mentioned in my first post introducing MagicScaler, it was inspired by Bertrand Le Roy’s blog post detailing an ASP.NET image resizer using WIC. His sample images looked decent, and the speed upgrade over System.Drawing/GDI+ was tantalizing. But when I grabbed the sample code and compared the image quality to GDI+… well… there was no comparison. It appeared WIC’s scaler was just no good quality-wise. In this post, I’ll be trying to answer the question of why that is.

Turns out it’s not that simple, actually. You see, WIC has a bit of magic of its own under the hood, and that makes evaluating its scaler a little bit more tricky than you might expect. The same goes for WPF, as it’s using the WIC primitives. I don’t think I’ll bother breaking down the performance/quality of WPF separately because its non-deterministic cleanup makes it a poor choice for server-side image resizing, but most of what I’ll say about WIC also applies to WPF.

The problem most people will have when evaluating WIC’s scaler is that they’ll start with JPEG source images, and WIC has some performance optimizations that kick in for JPEG sources. Both the speed and quality shown in the post I linked above were influenced by this. WIC has the ability, through the IWICBitmapSourceTransform interface, to use the image decoder’s native scaling capabilities to augment its own. Both the built-in JPEG and JPEG-XR (aka HD Photo) decoders support native scaling. I haven’t read up enough on JPEG-XR to know how it works, but since it’s a Microsoft-developed standard, you can bet their own decoder is the flagship, and it can apparently do native scaling in either direction in powers of 2. I’m more familiar with JPEG, where decoders can do native downscaling in the DCT domain by simply reinterpreting the encoded 8x8px blocks as a smaller size. That means it’s easy and fast to scale a block to 1/2 (4x4), 1/4 (2x2), or 1/8 (1x1) its size within the decoder, while the data is still DCTs rather than pixels. WIC will do this automatically if your processing chain is compatible, so the results you see from scaling a JPEG are likely a combination of the decoder’s native DCT scaling and the requested WIC interpolator.

That all means WIC can be unbelievably fast at scaling when it’s able to enlist the decoder’s help, but the quality will take a hit. Scaling in the DCT domain involves discarding some of the high-frequency data stored in the source image, so the scaled version will be blurry compared to one that is decoded at full resolution and then shrunk with a high quality scaler. That’s what I was seeing in my initial evaluation.

Those performance optimizations are great if you’re looking for the ultimate in speed and memory efficiency, but it does cloud the issue of exactly how fast the WIC scaler is and what kind of quality it produces. When scaling non-JPEG images or when adding steps (such as a crop) to the processing chain that are incompatible with IWICBitmapSourceTransform, you will generally find the speed will be worse, and the quality will be slightly better.

Ok... with that out of the way, I’ll move on to the titular topic. As in my previous GDI+ analysis, I’ll be using ResampleScope today. ResampleScope works only with PNG images, so we’ll know we’re looking only at the WIC scaler, not a blend with the decoder. I’ll start with the well-known algorithms before moving on the to mysterious ‘Fant’.

WICBitmapInterpolationModeNearestNeighbor

This one is just what you’d expect. Very fast, very bad quality… unless you’re in to the blocky look or are resizing some 8-bit art. It’s worth noting (or not) that while GDI+ and MagicScaler give identical output with their Nearest Neighbor implementations, WIC outputs a completely different set of pixels. Ultimately this comes down to a difference in what the interpolators consider to be the ‘nearest’ pixel, so they don’t have to match exactly to both be ‘correct’. But it’s interesting that they’re different.

WICBitmapInterpolationModeLinear

I’ll do the same set of tests I did with my GDI+ examination. First an enlargement, then a shrink to 50% and then 25%.

Oh, and in case you missed the link in the last post, Linear and Bilinear mean the same thing. Like flammable and inflammable.

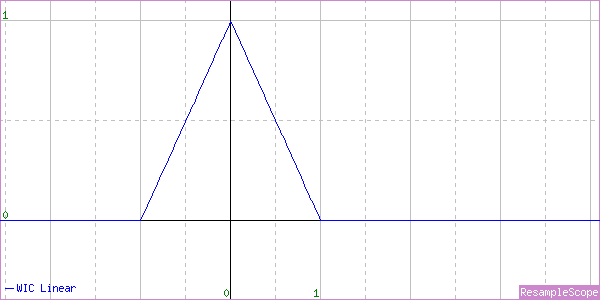
rswiclin

That looks nice. A perfect Triangle Filter for enlargement.

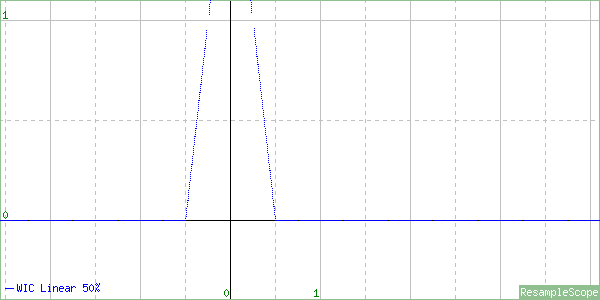
rswiclin50

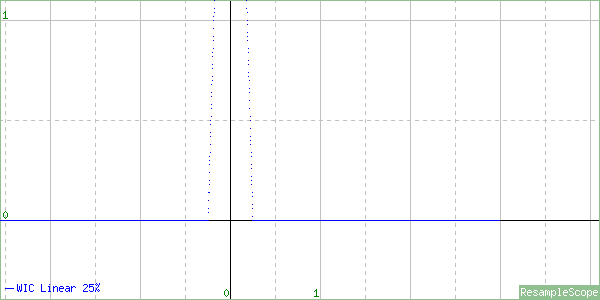
Oops. At 50% of original size, the triangle is just squeezed in. It’s not scaled at all, nor does it adapt toward a Box Filter by clipping the top and changing the slope like the GDI+ one does.

rswiclin25

At 25%, it’s just squished even more. If you resize far enough down, this will start to look a lot like a more expensive Point Filter (aka Nearest Neighbor).

To be fair, the WIC docs do describe exactly what we’re seeing here.

“The output pixel values are computed as a weighted average of the nearest four pixels in a 2x2 grid.”

That’s fine for enlargement, but normally an image scaler will scale the sample grid up when scaling an image down. In other words, when shrinking by half, the sample grid would be doubled to 4x4 to make sure all the input pixels were sampled. WIC simply doesn’t do this.

This interpolator is just plain busted for shrinking. Don’t use it.

WICBitmapInterpolationModeCubic

And here’s the Cubic implementation. Any bets on what we’ll see?

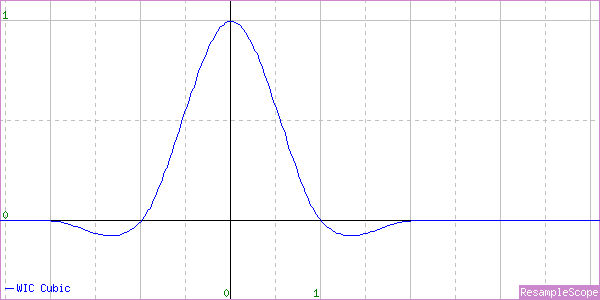
rswiccub

A nice looking Catmull-Rom Cubic for enlargement.

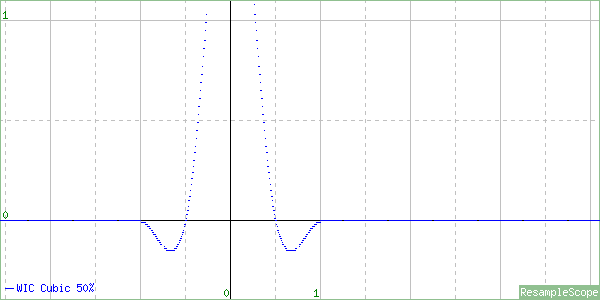
rswiccub50

A not-so-nice squished Catmull-Rom for the 50% shrink. Unacceptable for use.

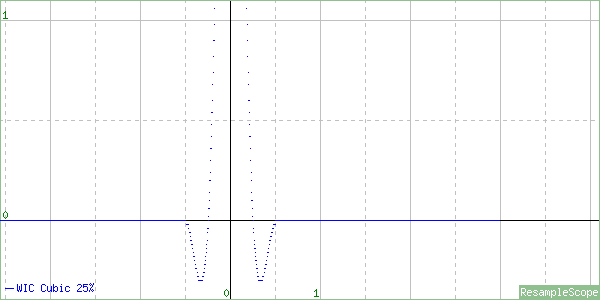
rswiccub25

Once again, we have an interpolator that is completely unscaled for shrinking. This will also converge toward looking like a Point Filter but slower and possibly with weird artifacts from the negative lobes.

And again, this is exactly what the docs describe if taken literally:

“Destination pixel values are computed as a weighted average of the nearest sixteen pixels in a 4x4 grid.”

WICBitmapInterpolationModeFant

Ah, the mysterious Fant algorithm… It’s difficult to find any good information on this one. The docs simply say this:

“Destination pixel values are computed as a weighted average of the all the pixels that map to the new pixel.”

So that’s a start. At least they’re saying they consider all the pixels, so we have reason to expect this one is properly scaled. But what is the algorithm and why is WIC seemingly the only thing using it?

The algorithm appears to be described in this 1986 paper and this 1988 patent by one Karl M. Fant, and it took all my google-fu to even find those. So it’s old and obscure… but is it any good? Well, the patent is short on math, and I have a feeling the paper isn’t worth the $31 it would cost me to see it, so we’ll just judge it by its output characteristics. Let’s start with an enlargement.

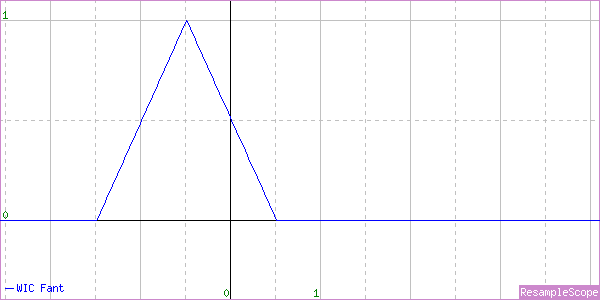
rswicfant

Hmmmm… that’s just a broken Linear interpolator. Note the half-pixel offset to the left (left means up when scaling vertically, so your output image will be shifted up and left). The patent that describes this algorithm is focused on real-time processing and mentions that the final output pixel in either direction may be left partially undefined. The left bias is consistent with those statements in that for real-time processing you’d want to weight the first pixels more heavily in case no more came along. This is particularly true when you consider the vertical direction, where you might not know whether another scanline is coming. It’s a decent strategy for streamed real-time processing but not great for image fidelity.

With that, I’ll move on to a minor (<1%) shrink.

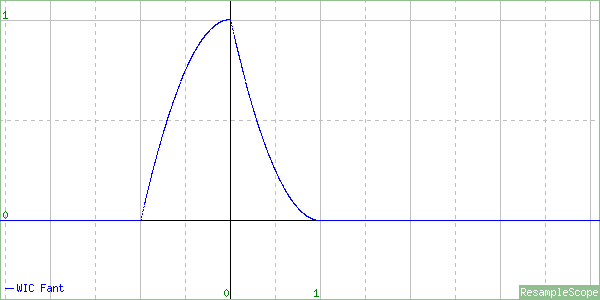
rswicfantd

WTFF is that? Looks kind of like a shark fin. This is the first asymmetric interpolator I’ve seen implemented in a commercial product. There’s probably a reason for that. The peak is now centered, but because most of the sample weight falls left of 0, this interpolator will also tend to shift the resulting image up and left. Again, I suppose it’s consistent with the design goals but not the best for quality. How about a 50% shrink ratio?

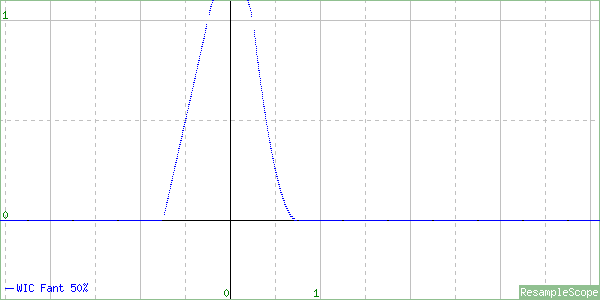
rswicfant50

Oh dear… They’ve just squished the shark fin. Sigh… Let’s look at 25%.

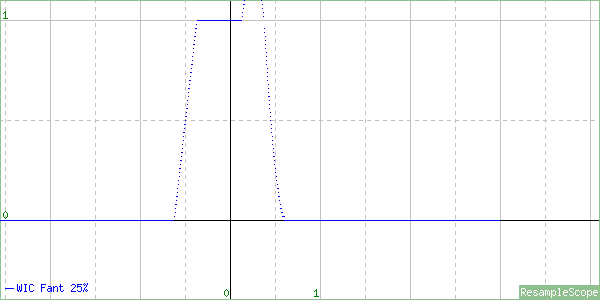
rswicfant25

Well, that’s something. It’s starting to look like a bit like a distorted Box Filter, so it is, in fact, sampling all the input pixels. It’s also much closer to being centered, so the up/left shift won’t be as perceptible when you do higher-ratio shrinking.

So there you have it… Fant means ‘broken Linear’ for enlarging, ‘slightly-less-broken Box’ for extreme shrinking, and ‘funky Shark Fin’ in between.

The best you can expect from this interpolator is somewhat blurry, possibly shifted output. At some downscale ratios, particularly around the 50% mark, you can expect even worse aliasing. I wouldn’t use it for enlarging because of the pixel shift and the fact that both the Linear and Cubic interpolators are correctly implemented for upscaling, so they’ll give better results in that (and only that) case.

The really sad thing is that this is the highest quality WIC interpolator available in Windows 8.1/Windows Server 2012 R2 and below. And it’s slightly worse than the low quality Bilinear interpolator in GDI+. That explains much.

WICBitmapInterpolationModeHighQualityCubic

This one just appeared in the SDK refresh for Windows 10, and I haven’t had a chance to check it out yet. I’m looking forward to that. I’ll do an update here when I do, but the description from MSDN sounds promising:

“A high quality bicubic interpolation algorithm. Destination pixel values are computed using a much denser sampling kernel than regular cubic. The kernel is resized in response to the scale factor, making it suitable for downscaling by factors greater than 2.”

So basically, it sounds like it’s a not-broken Cubic interpolator. That will be nice. Unfortunately, unless they release this in a Platform Update pack for down-level Windows versions, it won’t help anyone with ASP.NET resizing for quite a while. MagicScaler to the rescue!

Update 11/23/2015:

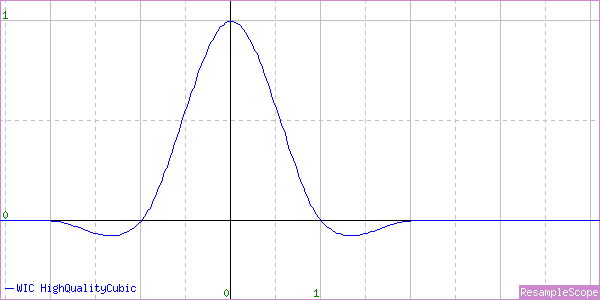
I finally got a copy of Windows 10 installed, so I was able to look at the new HighQualityCubic interpolation mode. I’ll jump straight in to the graphs:

rscwichqcubup

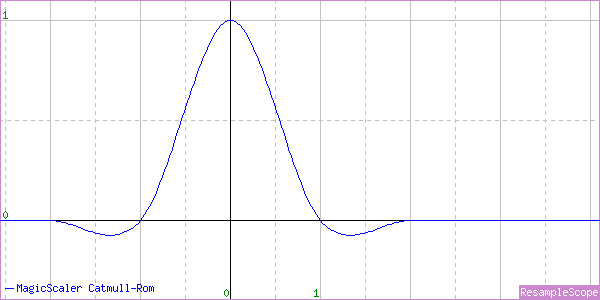
For upscaling, we have a mostly standard Catmull-Rom Cubic. I noticed when looking at this one that the curve isn’t quite perfect. It has a couple of weird bumps on it and is very slightly shifted right. By contrast, the MagicScaler Catmull-Rom shows a perfectly smooth and centered curve.

rscmscatromup

There shouldn’t really be a perceptible difference in image quality because of that, but I found it interesting. Looking back at the Cubic graph I did last time, it appears to have the same imperfections. Looks like maybe they re-used the code for this one. Let’s check out the downscale.

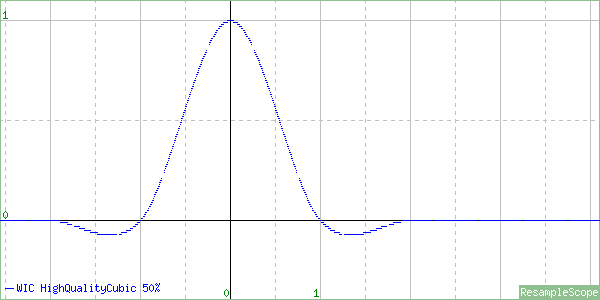
rscwichqcub50

Well, what do you know… it’s a properly scaled Catmull-Rom implementation for the 50% downscale. It also seems to be centered now.

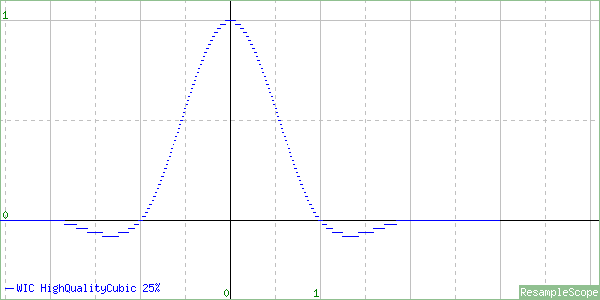
rscwichqcub25

And the same at 25%! Finally a proper built-in scaler in WIC. I’ll do some performance testing later, but this is looking like a great improvement for Windows 10/Windows Server 2016.
0 Comments

Welcome to the final post in my series examining image resizing with DrawImage().

In this final part, I will be covering the concept of image validation in the System.Drawing GDI+ wrappers.

There’s an easily-overlooked call in all the Image factory methods and Bitmap constructors that load images from a file or stream. After loading the image, they all include a call to the virtually undocumented GDI+ function GdipImageForceValidation(). I say virtually undocumented because the only reference I could find for it is this MSDN page. If you read the first paragraph of that page and then glance down at the very bottom of the table below it, you’ll learn two things:

  1. There is a Flat API for GDI+ that isn’t supported for use directly (you’re supposed to use the C++ class wrappers).
  2. GdipImageForceValidation() is only available in the Flat API.

I would hazard a guess based on those points that the function in question probably exists solely for use by System.Drawing. But what does it do? The table just says this:

“This function forces validation of the image.”

Well, that’s not particularly informative. Nor is it particularly accurate. I mean, I guess it does do some form of validation, but it’s the way it does it that’s of interest to us. What that function actually does is force GDI+ to materialize the bitmap during load. That can have a profound impact on performance.

Normally, GDI+ (like WIC, WPF, MagicScaler and anything else sensible) uses a ‘pull’ model for its processing pipeline. What that means is when you open an image file, the only thing done at that point is the image header is loaded and validated. It’s not until the pixel data is required (during DrawImage() in our case) that decoding, format conversion, color correction, etc is performed. And those steps are performed only for the pixels we actually consume.

Essentially, System.Drawing breaks that model by default and turns it into a ‘push’ model, where the image is first completely decoded into a bitmap in memory and then pushed through to the next step. That’s incredibly wasteful if, for example, you’re cropping a section out of a large image. Why decode the whole thing and use up all that memory if you’re not even using all the pixels?

In addition, using the default pull mode pipeline allows GDI+ to avoid ever holding the entire decoded bitmap in memory even if you are using all the pixels. It will instead read individual scanlines as they are needed. System.Drawing breaks that by default as well. In order to illustrate this, I wrote a sample program that uses four different methods of opening the same image file and then uses those images as inputs to DrawImage(). In each case, I resized the same 18MP source image to 100x100. The four methods I used are as follows:

  1. Image.FromStream(filestream, useEmbeddedColorManagement: true, validateImageData: true)
  2. Image.FromStream(filestream, useEmbeddedColorManagement: true, validateImageData: false)
  3. Image.FromFile(filename, useEmbeddedColorManagement: true)
  4. new Bitmap(filestream, useIcm: true)

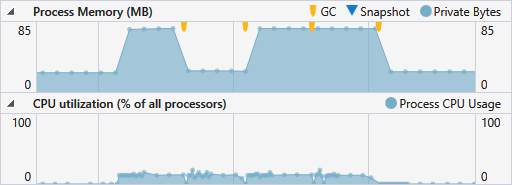
And here is the Visual Studio 2015 Diagnostic Tools graph of the CPU and RAM usage from a test run. I forced a garbage collection after each test to isolate the memory usage from each one.

valmemcpu

The area of higher CPU usage (bottom graph) covers the four test runs and the orange GC arrows mark the end of each one. The times before and after show the test app’s baseline memory usage, which was steady at around 23MiB. You can see that during tests 1, 3, and 4, the memory usage spiked up (to a peak of 75MiB in each case) whereas test 2 stayed down near the baseline (24MiB actually). Test 2, of course, is the one that disabled ‘validation’ of the image. In addition to the memory savings, the test without validation also ran more quickly.

valbreakpoints

Notice that test 2 took 42ms less than the best of the others. This was an expensive test in that the source image was high resolution and had an embedded color profile. Due to the sampling rate of the graph, it was easier to show the correlation between each test run and its memory usage with a slower operation. The corresponding improvement in performance when skipping validation is potentially more significant on a more typical operation. Here it amounted to 9%, but it’s not uncommon to see an improvement closer to 15% with high-res images.

The source image for these tests was a 5184x3456 JPEG. Just doing a quick bit of math, 5184 * 3456 * 3 (bytes per pixel) / 1024 / 1024 = 51.25MiB – the exact difference in memory usage between the tests with validation and the test without. 42ms of CPU time is nothing to sneeze at, but it’s not a huge deal. The extra 51MiB of memory can be pretty significant, though, especially when dealing with a server app. And of course more MPs means more MiBs.

But wait, there’s more!

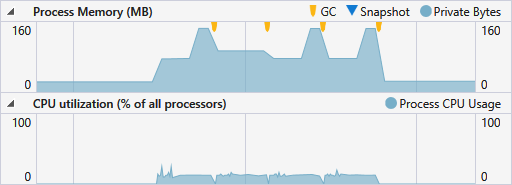
In my first trial, I kept things simple by using the default Graphics settings for my DrawImage() call. Stepping things up and using my recommended settings from Part 3 of this series, the graph looks like this:

valhqmemcpu

Here we see that the memory usage is a lot higher across the board and has some even higher spikes. The difference here goes back to my point about the HighQuality interpolators in GDI+ working only in RGBA mode. More specifically, they work in Premultiplied (or Associated) Alpha mode, aka PARGB. What happened here is that because my input image was a JPEG, it had to be converted from RGB to PARGB for processing. The baseline memory is the same in this trial: 23MiB. We can see the memory move up to 75MiB as soon as the image is loaded in test 1, just as before. It plateaus there while the image is ‘validated’, then it spikes again once DrawImage() starts. That moves it up to 144MiB(!). The reason for the second spike is the PARGB conversion. 5184 * 3456 * 4 / 1024 / 1024 = 68.34MiB. That, plus the buffering required by the scaler accounts for the difference in memory usage. During the 2nd test, the memory usage dips to a constant 93MiB, which is just the baseline plus the ~70MiB for the converted PARGB version and buffering. Again there, we save the 51MiB for the decoded image, so while the memory usage is high, it could be worse. Like in tests 3 and 4, which match test 1 exactly.

As an aside, in case anyone is wondering how I came to the conclusion that DrawImage() converts the source image to PARGB or whether that can be avoided, I’ll explain. The memory spike during the DrawImage() call very clearly correlates to a 32bpp copy of the entire source image being held in memory, as indicated by the math above. That seems to imply that it works in RGBA mode. I wondered whether this conversion always occurred, so I re-saved my test JPEG as an RGBA TIFF and ran the test again. The spikes were still there. But TIFF supports storing an alpha channel in either associated or unassociated forms, and I had tried it with an unassociated alpha channel first. So I re-saved again with associated alpha, and the memory graph profile changed to only include a single spike for each test (to 93MiB). Mystery solved. Note, however, that although the conversion didn’t happen with the PARGB image, the HighQuality interpolation modes do apparently require that the entire image be decoded into memory for processing, which is why all the tests showed the same memory usage. Whether the image was loaded during the ‘validation’ step or at the start of DrawImage(), it was completely held in memory for the duration of each test.

Getting back to the above graph, the more astute among you may have noticed that in test 2, the PARGB copy was held in memory for the entire length of the test, which would lead you to believe that DrawImage() took longer. And you’d be right. When the validation step is performed, the entire decode and color management process occurs before DrawImage() starts, so less time is spent in that method. And while we haven’t discussed it in this series, some of you might be aware that DrawImage() holds a process-wide lock while it does its work. I’ll be talking more about that when I compare GDI+ with MagicScaler.

With that locking business in mind, you might be thinking it’s worth doing anything you can to reduce the amount of time spent inside DrawImage(). There, you’d be wrong (IMHO). Consider a scenario where you have a large number of image resizing requests coming in to a web app simultaneously. If you allow all of them to completely load their corresponding bitmaps before queuing up for their turn at DrawImage(), they could be waiting in that queue for a long time with all that memory held. You’ll potentially have a memory spike that can cause the server to start paging memory or may cause your app pool to cross its memory limit and get recycled. Those things are bad. I would suggest letting them queue a bit longer without tying up any memory. The total processing time will be reduced, and your app will be more stable. In fact, considering that, and seeing what we saw above with regard to the amount of memory consumed by a single resize operation, it seems that GDI+ has a good reason for not allowing you to run multiple DrawImage() operations in parallel. Depending on your workload, the memory requirements could be ridiculous.

So I think I’ve made my point by now that System.Drawing’s ‘validation’ of the image is all-around bad for performance. What can you do about it? Well, be like Test 2. That’s the one (and only one) way to skip the validation step from System.Drawing. Because the validateImageData parameter to Image.FromStream() is not available on any of the Image.FromFile() overloads, I use a FileStream and pass that to Image.FromStream() whenever loading from a file.

“But skipping validation sounds dangerous”, I hear some of you saying…

Actually, I can’t find any evidence to suggest it’s dangerous at all, nor have I ever had a problem with it in the many years I’ve been doing it. I suppose It’s possible that in olden times, the GDI+ image decoders might have been able to cause access violations, buffer overflows, etc when reading corrupted image data. It’s also entirely possible the designers of System.Drawing just went into total overkill mode when working on the safety of the framework.

What I can say for sure is that starting with Windows 7, GDI+ uses WIC internally for decoding/encoding. And I can say that WIC’s built-in decoders are extremely resilient when it comes to corrupted or truncated files. Keep in mind, WIC is used by Windows Explorer and Internet Explorer, so it has to be pretty well bulletproof. So as far as I know, there is absolutely no risk to skipping the image data validation step from System.Drawing. You can read more about Microsoft’s security recommendations for WIC codec developers here. It’s a safe bet their codecs follow their own advice, and GDI+ doesn’t allow you to access any third-party codecs which may be less safe.

In my own testing of a suite of broken image files, the WIC decoders always either silently decoded what they could of the images (filling in the rest with blank pixels) or threw an exception as soon as the header was loaded. What’s more, in the cases where WIC silently processed the corrupted images, GDI+ failed to report any problems in its validation step despite the images being corrupted or incomplete. That’s further evidence it’s not doing anything for you that the underlying WIC decoder isn’t already.

And really, if the validation is actually worth doing, why is GdipImageForceValidation() left out of the supported C++ wrappers?

Anyone?

Bueller?

Tune in next time when I’ll turn my copy of ResampleScope loose on the WIC interpolators to see how they do. It’s gonna be fun on a bun.